.png)
ACTIVE DIRECTORY HOMELAB WITH SPLUNK INTEGRATION
01 Introduction
I will be conducting a walkthrough on setting and configuring an Active directory lab which consists of certain platforms like Splunk and Kali Linux. I will also be running the Atomic Red Team framework, which is an open-sourced library consisting of MITRE ATT&CK scripted tests to help alert a security system’s defenses. By Conducting the lab, I was able to examine how a domain environment works, the process of initializing users within an active directory, ingesting events into a SIEM, and creating telemetry in regards to real-world attacks to improve future threat detection and defenses. By using the Atomic Red team to simulate the attacks, I was able to effectively use splunk to ingest events and practice attacking a device from a remote Kali Linux device. This lab has improved my capability to effectively identify and address security threats. This project not only offered practical experience but also emphasized the significance of proactive measures in strengthening cybersecurity defenses.
02 Lab Setup
For the lab I utilized 4 virtual machines (VMs) to help simulate the lab environment through Oracle Virtualbox, a virtualization software capable of creating VMs on a single host machine.
-
Ubuntu Server: Hosted the Splunk server.
-
Kali Linux: Functioned as the attacker.
-
Windows Server 2022: Provided Active Directory services and sent logs to Splunk.
4. Windows 10 Virtual Machine (VM): Served as the target machine and sent logs to Splunk.
.png)
03 Configuration
Note: Please install your own VMs by yourself before continuing with the walkthrough.
Configuration Steps
1. Setting Up the Network:
First, I created a NAT network and configured the network settings for all the virtual machines (VMs) so they could all communicate to each other and access the internet through my host machine.
2. Giving the Ubuntu Server a Static Address:
Next, I made sure the Ubuntu server was set to the same static IP address (192.168.10.10) to establish uniformity and a DNS server of (8.8.8.8), which is also one of Google’s public DNS servers.
3. Getting Splunk Up and Running:
I downloaded and installed Splunk Enterprise on the Ubuntu VM. One can do so by traversing to the Splunk website and downloading the free edition of Splunk enterprise. This enables splunk to help us keep an eye on what's happening across all our machines.
4. Getting the Windows 10 Machine Ready:
I renamed my Windows 10 VM to "target-PC", to help easily identify the VM during the lab, and set its address to 192.168.10.100. Then, I checked the connectivity by accessing the configured Splunk at 192.168.10.10:8000. - look into the ip
5. Setting Up Splunk Forwarder:
On the target-PC, I installed Splunk Universal Forwarder. This tool can be configured to send specific telemetry to Splunk so we can keep track of information a user may be interested in without being bogged down by irrelevant telemetry.
6. On the target-PC machine, head over to the Microsoft Website to download Sysmon, an internal Microsoft Suite tool. Once downloaded I would download a Sysmon configuration file from olafhartong on GitHub, a file that detect attacks based on the MITTRE Attack, and make sure our Sysmon file adopts the configuration.
7. Configuring Splunk Forwarder:
I set up the Splunk forwarder on the target-PC to send the exact telemetry we need back to Splunk. This is done, under administrative privileges, by creating and configuring an input.conf file in the “C:\Program Files\SplunkUniversalForwarder\etc\system\local folder” where we add our specified events.
After making the configurations, I restarted the Splunk Forwarder Service under the Windows “Services” application.

03 Configuration (Continued)
8. Making Sure Splunk Is Ready:
- Since we are to receive telemetry from the Splunk forwarder, I configured Splunk to listen for incoming data on the default port 9997. This way, it's all set up to receive the information we're sending from the forwarder.
9. Repeating/Looping for Windows Server 2022 VM:
- I went through the same steps (4-9/8) for my Windows Server 2022 VM, making sure it was set up and configured just like the Windows 10 machine.
10. Setting a Static IP for the Windows Server:
- The Windows Server needed a stable address too, so I set it to 192.168.10.7 to keep everything organized.
Note: you can ping or ip config to confirm that the correct ip address is correct for the machine.
- Configuring Windows Server VM
-
Go ahead and open up the Windows Server Manager application installed earlier.
Then, Head over to manage and click on “Add Roles and Features”
11. Getting Active Directory Ready:
- When configuring continue the prompts normally until reaching the Server Roles tab on the right pane and click on the Acitve Directory Domain Services (ADDS):
Continue the prompt normally until you successfully complete installation of the ADDS:
After installing the ADDS, one must promote the server to set up the server as the domain controller:
I then configured the domain controller with the name "mydfir.local" and then continue the prompt normally until installation:
After completing installation, you are automatically signed out and you should see a sign-in account that is named based on our domain name including a backslash indicating we ‘ve successfully installed our ADDS and promote the server to a domain controller:


04 Creating Departments and Users
On the Server Manager dashboard, I head over to the tools tab and select the “Active Directory Users and Computers”. This allows me to create separate groups called "IT" and "HR" in Active Directory and add a user to each group. It helps keep the management of users organized and secure.


05 Joining the Target-PC to the Domain
I connected our target-PC to the "mydfir.local" domain, making sure it could find everything it needed through our domain's settings.
Follow the steps:
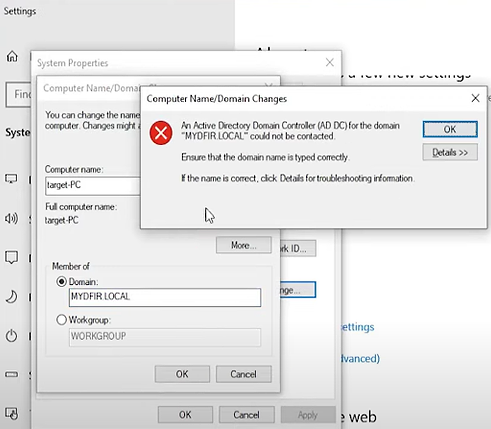
1. Search for "PC" and click on "Properties."
2. Then click on "Advanced system settings."
3. Under "Computer Name," select "Domain" and type the domain name `MYDFIR.LOCAL`. Once you confirm your configuration, you will run into an error. We can troubleshoot this error from our target machine since it doesn’t know how to process or resolve “MYDFIR.LOCAL” which is sourced back from how DNS works.
4. To resolve this error, right-click on the wifi-adapter icon on the task bar and select "Network and Internet settings," then click on "Change adapter options."
5. Right-click on the adapter, select "Properties," and choose "Internet Protocol Version 4."
6. Change the DNS server from `8.8.8.8` to the domain controller at `192.168.10.7`.
Note: To confirm the change, open Command Prompt and type `ipconfig /all`.
7. Join Domain to Target VM:
- Retry to join the “target-PC” with the domain
After attempting a successful join, you will receive a prompt to enter credentials before finalizing the join.


06 Setting Up Kali Linux with a Static IP
On my Kali Linux machine, I set a static IP address (192.168.10.250) to keep things consistent based on the diagram created earlier, which helps when we're testing and tracing different attacks.
To do this right click the internet connection on the top pane of Kali Linux and select edit connections.
Select the Function Cog
Next, select the IPv4 setting profile and change the method to manual and fill out the rest of the information for address and DNS servers:
Note: To check if our connection configurations are correctly set up, open the terminal and run the commands “ip a” to display addresses, ping public domain names like google.com, or ping against our created servers.
To prepare for our real-world simulated attacks, open the terminal and drop the commands in the following picture.
This will create a special folder named "ad-project" on Kali Linux which is where I stored all the files we'd use to test how secure our setup is. The tool we download, Crowbar, is a brute-force tool commonly utilized in various pen testing environments or situations. It can also help us test how strong passwords are against attacks.
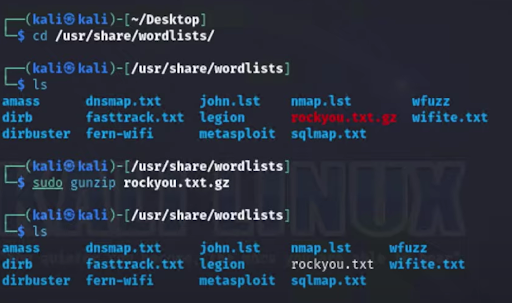
The next step is to extract and edit a file called “rockyou.txt” which consists of a well-known wordlist that comes preinstalled with Kali Linux. The common words found in the lists are often utilized in password cracking or a dictionary attack, and for security auditing as well. I utilize the list of passwords for a simulated attack by extracting and modifying a personal password list to use for brute force.
This is for extracting the file:
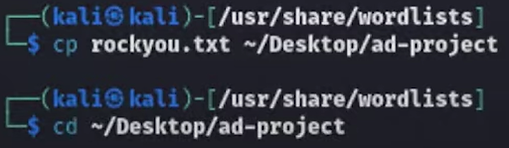
Copying the file into the ad-project folder and moving myself to the folder:
This will copy the first 20 words inside the rockyou.txt file and input into the passwords.txt file
Went ahead and edited the password.txt file to enter a custom secured password:
Having established a good starting point for brute-force testing, I made sure we could access our Windows 10 machine remotely by turning on Remote Desktop. Then, I added the users from Active Directory who needed access.
Using Crowbar on Kali Linux, I launched a test to see if I could break into the Windows 10 machine using the passwords from our list. I utilized this command to create telemetry:
Running the command will have crowbar test all the passwords listed within the passwords.txt file. Keep in mind that having a success status after running against a password means the login attempt was a success, and that it is still only targeting the Windows 10 VM and not the entire network we’ve set up.
After the test, I headed over to the Windows target machine and looked at the data in Splunk to see if we could spot any signs of an attack. It's crucial to catch these things early. I would check by checking for related event Splunk fields and find the stats of event codes 4625 (failed logins) and 4624 (successful logins) to confirm if our test had worked and if there were any security issues.
Note: If you don’t know what these codes mean, you can simply look up it up such as “event id 4625”
We can also delve into the logs deeper and see what credentials and addresses and other telemetry took place:
To test our defenses further, I installed Atomic Red Team on our Windows 10 machine. It lets us simulate different kinds of cyber-attacks.
Run this command to bypass unknown scripts:
And run an exclusion on the entire drive, C:\
You should be enabled to install Atomic Red Team, and the command line to install is:
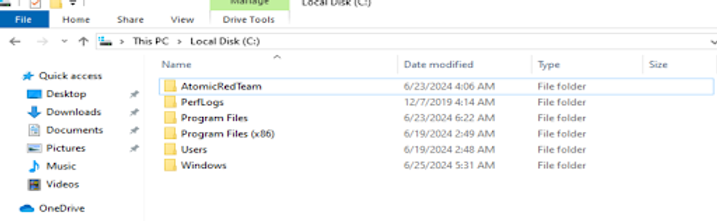
After the download is complete, Atomic Red Team will be available on the C: Drive
I went to check the contents of the “AtomicRedTeam” folder and saw sub folders of techniques based on the MITRE ATT&CK framework:
I also simulated using PowerShell for an attack utilizing the sub-technique (T1136.001).
I initialized the technique by calling out the command
I am then given an executed script that shows the details and was created from the sun-technique attack.
It appears that a “NewLocalUser” was created from the attack. Having and analyzing such information from the script allows us to understand an attacker’s motive and what step they’re in during their attack.
Again, I checked Splunk to see if it could detect this kind of activity and discovered information of a new account existing for “NewLocalUser” within the logs.
When running techniques, I recommend using words from the Invoked Red Atomic PowerShell script and adding it to the Splunk search to help improve one’s detection skills. If you are sure you cannot find it in Splunk, this may be a tell-tale sign that there is a gap in detecting an attack, and may require you to do more research and utilize different tools to understand the executed attack technique. I also recommend attempting to invoke or initialize other techniques from Red Atomic, and research or analyze with tools like Splunk in order to help better understand how an attack works. I have tried some techniques myself as well!
When running techniques, I recommend using words from the Invoked Red Atomic PowerShell script and adding it to the Splunk search to help improve one’s detection skills. If you are sure you cannot find it in Splunk, this may be a tell-tale sign that there is a gap in detecting an attack, and may require you to do more research and utilize different tools to understand the executed attack technique. I also recommend attempting to invoke or initialize other techniques from Red Atomic, and research or analyze with tools like Splunk in order to help better understand how an attack works. I have tried some techniques myself as well!
Doing this lab has helped give me better insight on various aspects of a SOC analyst. Such aspects were the ability to analyze and detect attacks early. Most importantly I gained insight into the process of configuring an Active Directory in order to improve management and security for users and the machine itself. The lab has tremendously improved my understanding of cybersecurity and proficiency in establishing the skills necessary as a SOC analyst.


07 Preparing for Attacks

08 Getting Passwords Ready


09 Enabling Remote Desktop on Windows 10

10 Testing with Crowbar

11 Checking Telemetry in Splunk


12 Installing Atomic Red Team


13 Generating Telemetry with Atomic Red Team


14 Key Takeaways and Conclusion